Tuesday, December 10, 2013

One of the Best Tech Deals Ever

For our kids' entertainment on long road trips we've been using portable dvd players. Though they work fine, they are a pain to install and remove before and after each trip.  So I thought what would be better would be to provide each child with an Android tablet, with which he or she could watch videos, play games, track our progress, etc.  I had been looking for some inexpensive 7" tablets that were powerful enough to play video and games smoothly, for under $150.  The top contenders were the Asus Memo HD 7 , and the Barnes and Noble Nook HD.  I was hoping a good deal would turn up on Black Friday, but it wasn't until Cyber Monday that I found a deal that turned out to be one of the best deals on tech that I have ever gotten.  The tablet is the Hisense Sero 7 Pro.  New ones are only sold through Walmart, for $129.  On Cyber Monday, Newegg were selling refurbs for $85!  I couldn't pass that deal up!


Spec-wise, it's pretty good.  Not top-tier this year, but it would have been up there last year.  Some of the specs: Tegra 3 quad core running 1.2GHz, 1 GB memory, 8 GB storage, microSD card slot, GPS, mini-HDMI, 2.0 MP front camera, 5.0 MP rear camera with flash, 1280x800 display with 5 point multitouch, 4000 mAH battery, runs Android 4.2.  The price was so good that I bought three of them!


I got the cases on Amazon, a different color for each kid.  Guess which one is Jessica's.  The only problem I ran into was a bad usb cable for one of the tablets.  Rather than send it back, I just bought another one cheap on Amazon.  Otherwise, the tablets are awesome!  Noticeably faster than my Samsung Galaxy Tab Plus 7.0.  Everything works and works well.  Video is smooth.  Games work well.  GPS works well.  Sound is good.  Couldn't be happier.  These would be good tablets at $150.  They are fantastic at $85.

Bathroom Faucet and Drain Replacement

For over a year the faucet in one of our bathrooms has been dripping.  Initially, we could stop it by turning the handle a certain way.  Recently, however, the turning trick stopped doing the trick.  So, I knew it was time to change this thing.  Here's the piece-o-crap faucet:


Never liked this thing, ever since installing it about 11 years ago.  It worked well for about a month, then started getting stiff.  It also started corroding. Then dripping.  Moen just sucks.  I installed a Moen kitchen faucet that was terrible.  I didn't want to repair the thing; just wanted to replace it.  Here's the drain that's going with it:


I had installed an American Standard faucet in another bathroom several years ago, and it works well, so I bought one for this bathroom several months ago.  Just never got around to installing it 'til now.


First, I had to get under the sink to remove the old faucet.  Check out this drain, clearly some leaking going on here:


Removing the faucet involves first removing some nuts. They were a little difficult to get off due to corrosion, but that's pretty normal from my experience.


 I really like the way American Standard designed this faucet.  They use these large threaded brass pipes that are secured with plastic nuts.  Very easy to put on, and corrosion won't be a problem.


Once the faucet was installed, I installed the drain, which was pretty straightforward.  the mechanism for the pop-up stopper was interesting.  I've never seen one like this, but it works very well.


And here's the brand new faucet!  Woohoo!


And a shot of the drain:


Sunday, November 10, 2013

Reflowing the IGP

Well, my new Asus S400CA has to go back because of a problem with the wifi.  As it is still under warranty, Newegg said they would replace it.  But, it may take a few weeks.  Needing a computer during those few weeks, I decided to try to fix my broken HP (graphic processor not working).  Here's what the display looks like during post:


After researching this problem, I found out the following:

1) It's common with some models of HP laptops.
2) It is caused by the solder failing in the IGP's (Integrated Graphics Processors), usually for nVidia GPUs (mine is an AMD Radeon).
3) Reflowing the solder generally fixes this problem.

Reflowing the solder involves heating the chip until the solder melts, and then letting it cool. The failed solder melts and re-solidifies, fixing the problem. There are lots of videos on youtube which show how to do this.  Although they all do it a little differently, the basic principle is the same.  The procedure is pretty straight forward, but involved.

Here's how I did it.  First, I took the computer apart.


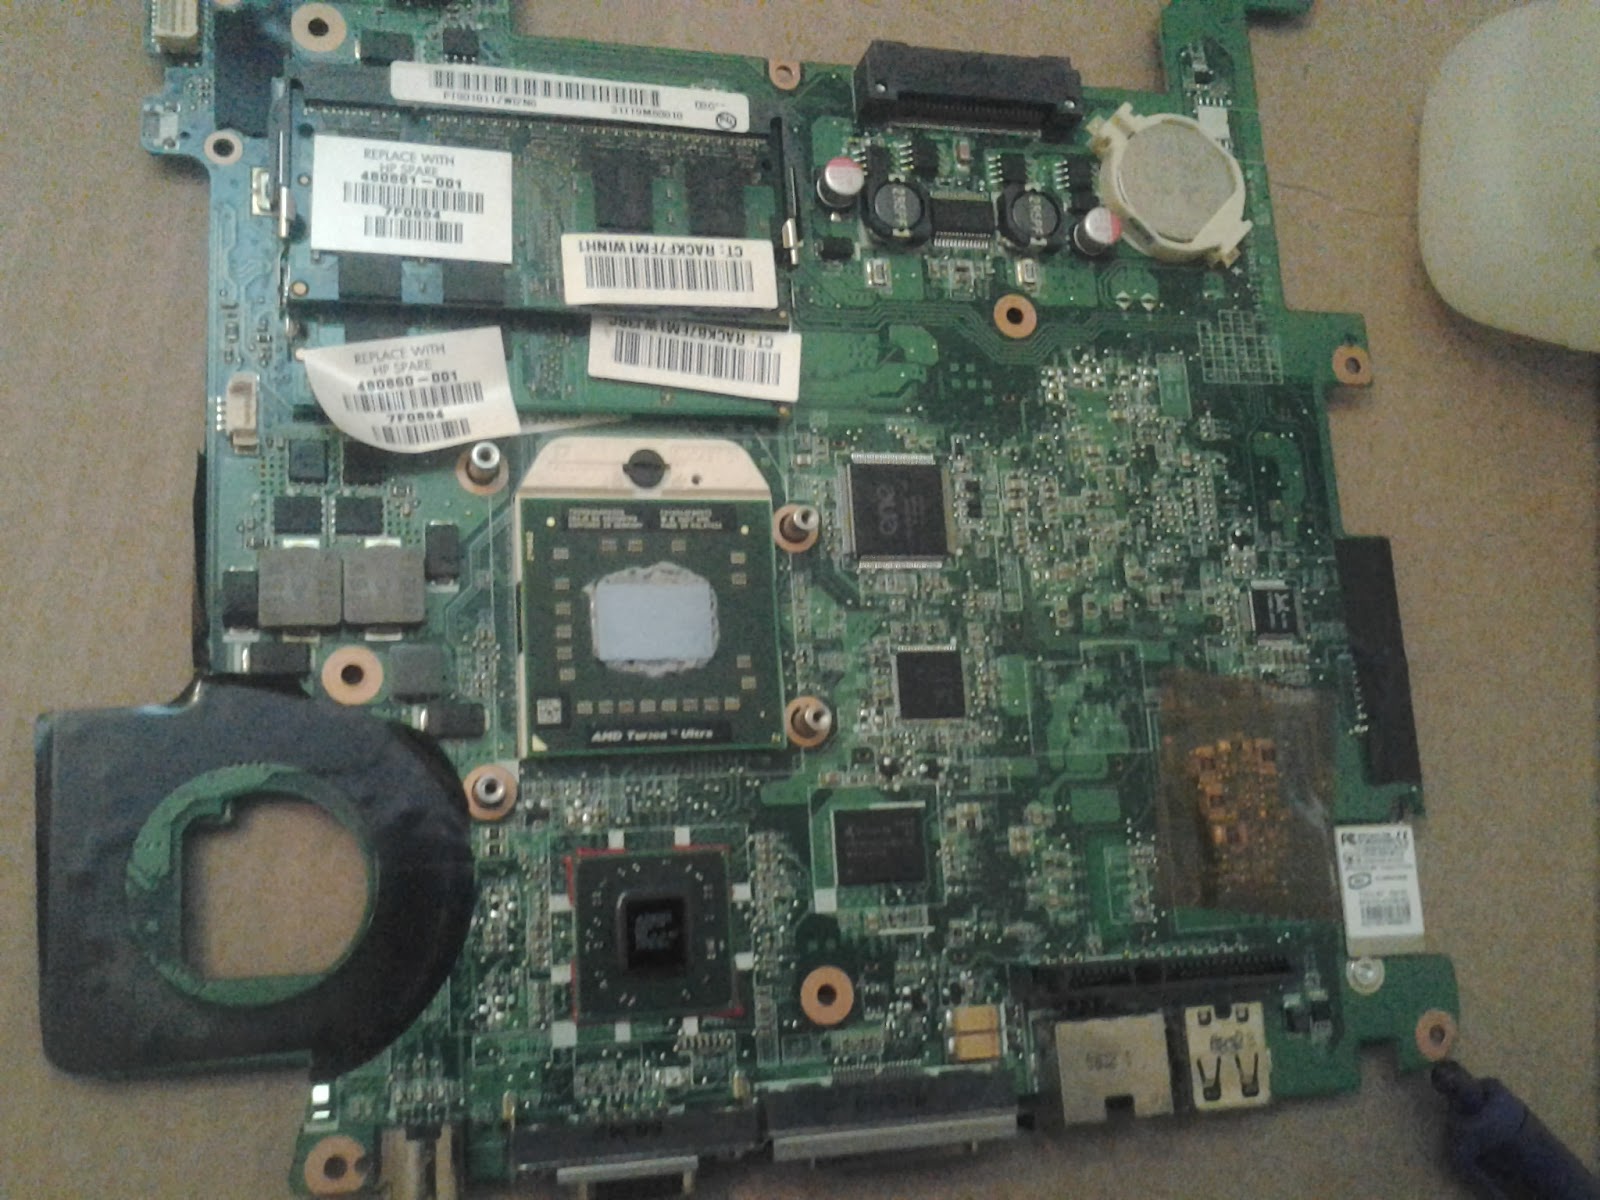
Here's a shot of the CPU and IGP:


A shot of the motherboard showing the relative position of the CPU and IPG:


The CPU had a whole bunch of hardened thermal crap all over it, which I scraped off with some difficulty.  Also, the IGP had this "thermal pad" on it:  Doesn't look to be very thermally conducting; more like an insulator.


Here's the heatsink which is supposed to keep the CPU and the IGP cool:


I had to scrape the thermal crap off of this also.

High heat is needed to melt the solder, so I had to make a shield to protect everything but the IGP from the heat.  It consisted of layers of cardboard.  First I cut out a template to expose the IGP and protect the immediately surrounding area:


I made two of these, and stacked them to provide a base for a cardboard shield for the entire motherboard.


Then covering it with foil, the shield was ready:


I got this heat gun from Home Depot to do the heating:


I had to figure out how long to apply the heat and at what distance.  I decided to get some solder I use for electronics hobby work, and see how long it would take to melt it with the heat gun about two inches above the solder. I used several pieces of solder and applied the heat with the heat gun.  The first piece started to melt at about 1 min 35 sec, and the last one melted at 2 min 05 sec.  So I decided to apply heat for 2 min 10 sec:


After it cooled, I was ready to put the heatsink back on.  However, I decided I was not going to use that thermal pad again.  I wanted to use a copper shim, but did not have one.  So I decided to make my own.  I got a copper pipe hanger at Home Depot:


I cut a piece off of it to use as a shim:


I also decided to use some good thermal compound, so I got some Arctic Silver:


Here's the heatsink reinstalled with the DIY shim:


Reassembled the computer, and turned it on.  It worked!


Not sure how long this fix will last, but at least I have a working computer!  Hopefully it will last at least until I get the Asus back.

Sunday, October 27, 2013

Snakes in the Attic?

A few days ago, the Orkin termite inspector did an inspection of our house.  While he didn't find any termites, he did note that the screen covering a vent on the west gable end of our attic was pulled open, and that there was a huge squirrel's nest below it.


He stated that squirrels pulled the screen down and built the nest.  He said that Orkin could staple the screen back up, clear out the nest, and put down a few inches of TAP (Thermal Acoustical Pest Control), a blown-in cellulose type of insulation laced with boric acid.  He said that the boric acid would kill any insect infestation, and would repel the squirrels.  Cost would be about $1000-$2,200, depending on the thickness of the TAP.

I was extremely surprised that the screen was pulled down.  A couple of years ago, I had gone up there and found the screen for that vent totally torn-up, and that huge nest below the vent.  I thought it was a bird's nest because I found about 15 dead birds up in the attic.  So I replaced the torn screen with an aluminum fine-meshed screen (the kind for windows), and a 1/4" "hardware cloth" (a mesh made of galvanized steel, I think). I left the nest because...well...it was huge and I was lazy.  Anyway, I stapled the screen and hardware cloth up with probably 50+ staples, so I was quite shocked that the screen was partly pulled off.

Well, I went up there today and found that although the hardware cloth was partly pulled down, the fine-meshed screen was still intact.  Basically, nothing could get through it.  So, it occurred to me that either the hardware cloth came off by itself (unlikely), or someone pulled it off.  Now, I am the only one in my family that goes up there.  I was up there last December or January, and everything was intact.  So I suspect that the Orkin guy pulled the hardware cloth, leaving the fine-meshed screen.  I decided to repair this thing so nothing, not even an Orkin guy could pull it off.  I used some 1" #10 stainless steel screws, with 1 1/4" washers:


After screwing down the hardware cloth with some of these and adding about 50 more staples, it was fixed:


I then decided to check the east gable vent.  To my surprise, there some rather large wasp nests on the it inside the attic:


Close inspection revealed holes in its metal screen, probably pecked out by birds or a squirrel.  So I put a new screen on to cover the entire vent.


I also found something while up there that totally shocked me.  Check it out:


A shedded (molted?) snake skin!!  What would a snake be doing up there?  How would it get up there?  Maybe somebody put it up there?  The Orkin guy?  Anyway, weird.  I don't think there are any snakes up there now.  I had spend a lot of time up there in the past couple of years, and had never seen any snakes or signs of snakes.

Monday, September 2, 2013

One Ledger Board Installed, One to Go

Installing a ledge board took me longer than expected, but I was able to install one on the south wall today.

Since the ledge boards determine the level-ness of the entire desktop, it is extremely important to get these things level.  A laser level comes in handy for this.


It projects a horizontal line and a vertical line, and is self-leveling.


It is easiest to first mount the board using one screw in the middle, then rotate as needed to get the board level.  It was difficult to line it up with the height of the height I wanted; I was about 1/8" off.  Hopefully I will be able to line up the west wall ledge board with one on the south wall.  I used 1/4" lag screws to mount the board:


I Forstner bit was used to set in the screw head, and a flat washer provides some support in the hole.  Here's the board mounted:


I'm not sure when I'll be able to get to the other ledger board.  Hopefully soon, like this weekend.  I have to focus a bit on work (the one I earn a living from), which isn't going too well at the moment.  Also, I injured myself, while cleaning up, of all things, so I think I need to take a bit of a break anyway.


Sunday, September 1, 2013

Desk-building Begins

I'm attempting to document the building of my desk.  It will be an L-shaped desk attached to two adjacent walls in my home office.  One side will be 8' long, and the other side will be about 8' 4" long.  I got the idea from this instructables: http://www.instructables.com/id/Simple-Rock-Solid-Cantilever-Desk/  My design is slightly different, and it will have a bottom shelf.

Here are what the walls look like right now:


The blue tape marks studs and screws.  I got some 2x4's today from Home Depot to build the supports for the desk:

I was amazed at the poor quality of the lumber.  It was difficult to find really straight studs.  And the wood was quite moist.  I'm hoping that the wood won't warp as it dries.

I'm going to attach the ledgers tomorrow.